Free and easy tech tool for background removal
In this article, you will learn how to make a white background invisible and the in-between greyish area transparent using a free online tool for photo editing, which is (almost) as powerful as Photoshop!
First, go to Photopea. It is an advanced web-based photo and graphic image editor that allows you to do most of what Adobe Photoshop offers. In my opinion, it is the best free alternative to Photoshop and GIMP.
Note: Photopea does not sponsor it. All I am writing here is my honest opinion after using it for a while as a comparison with Photoshop.
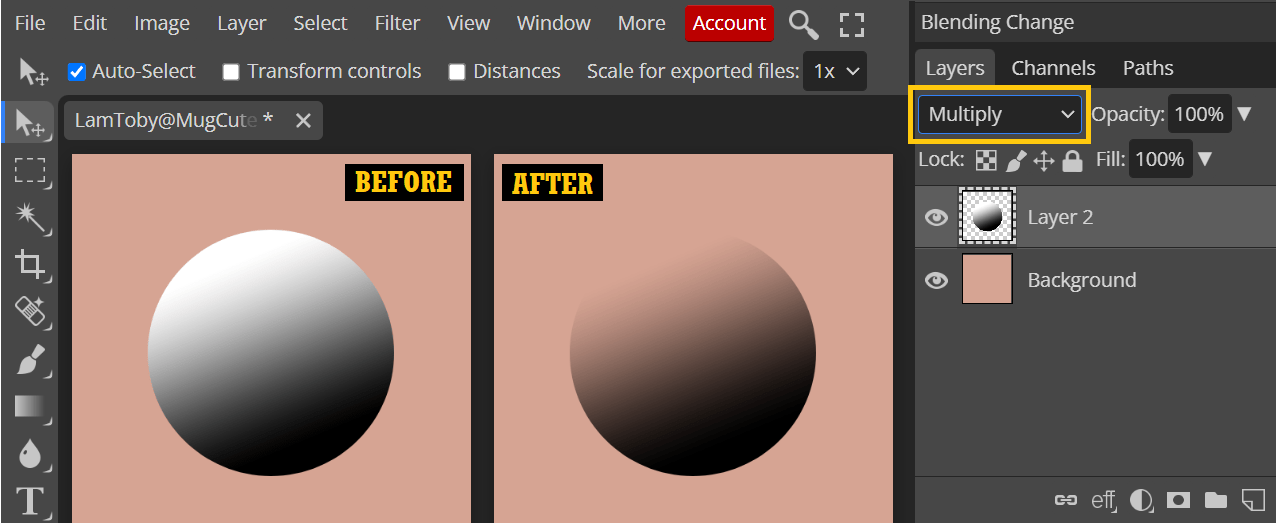
Case I: Hide all bright areas with a background beneath
Suppose you have an image with a white background, and you want to change it to another one; all you need to do one simple click. The trick here is to change the Blending Mode to “Multiply.” This is because the multiply blending mode takes each color pixel from the current layer and multiplies them by the colors underneath it. By changing the blending mode, you can control how a layer reacts with the layer below it. You can treat all white colors as “1” while all black colors as “0.” So, when you multiply white (1) by any color x, you will get precisely the color x beneath because one multiply x will always be x, making it look like it is invisible. On the other hand, when you multiply black (0) to any color y, you will always get the black color because 0 multiplies y will always be 0, making it black.
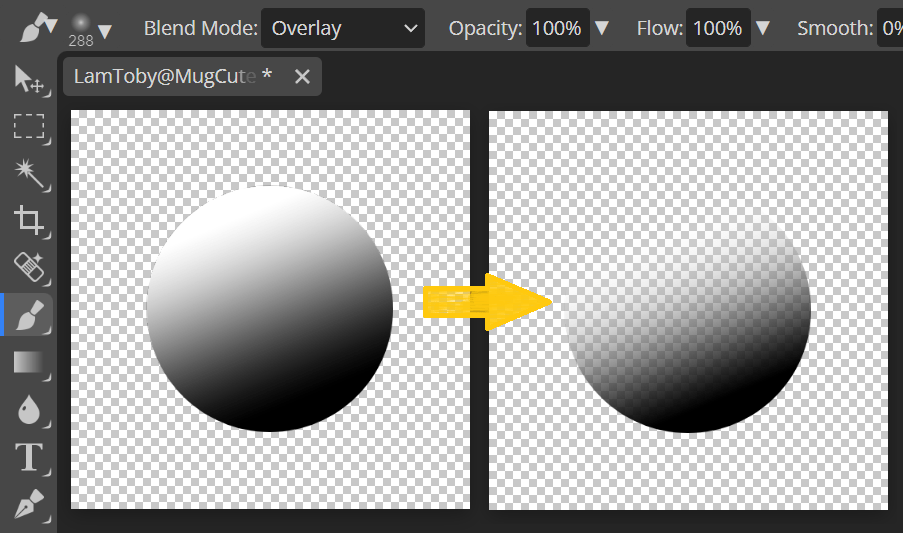
Case II: Make the bright/White background transparent
If you wish to save it as a transparent image format like a PNG file, you can follow the steps below to make any bright area transparent. This is a very powerful and useful trick that can apply to various situations.

- Select your layer in the Layers Panel. If you cannot find your layers, go to the Window menu and click Layers.
- Click the “Layer Style” button at the bottom of the Layers Panel.
- Select “Blending Options.”
- Ensure “Gray” is selected under the Blend If’s dropdown box.
- You will see four small triangular arrows below the “Current Layer” slider. This slider allows you to control the visibility of the current layer. Hold onto the Alt key and drag the left arrow from white to black. Drag it all the way to the black side will make the most smooth and natural transition.
- Slowly drag the right triangular slider icon from white to black until you are satisfied with the result.
- On the contrary, if you want to make the dark area transparent, you can hold onto the Alt key and drag the right arrow from black to white.
- Click the “OK” button when you are happy with the result.
- Go to the File menu and select Export > Export As to export your image to any file format you like. If you want to keep a copy of every layer, you can choose “Save as PSD” to save it as a Photoshop Document.
Hope you find it helpful. Let me know if you have any questions; I would love to help further. If you are looking for speedy, high quality and well-priced work from a professional photo editor, check out more of the photo editing services available here.